Real Estate Photography plays a major role in attracting potential buyers and making property listings stand out. High-quality photos create a strong first impression, helping viewers imagine themselves in the space. In today’s digital market, most buyers start their search online, so clear, bright, and professional images can make all the difference in getting more views and faster sales.
With the right techniques, anyone can take impressive property photos. In this guide, we’ll share 6 top Real Estate Photography tips to make your listings more appealing and professional. From perfect lighting to smart editing, these simple tips will help you showcase every property at its best and grab buyer attention instantly.
Tip 1: Use the Right Equipment
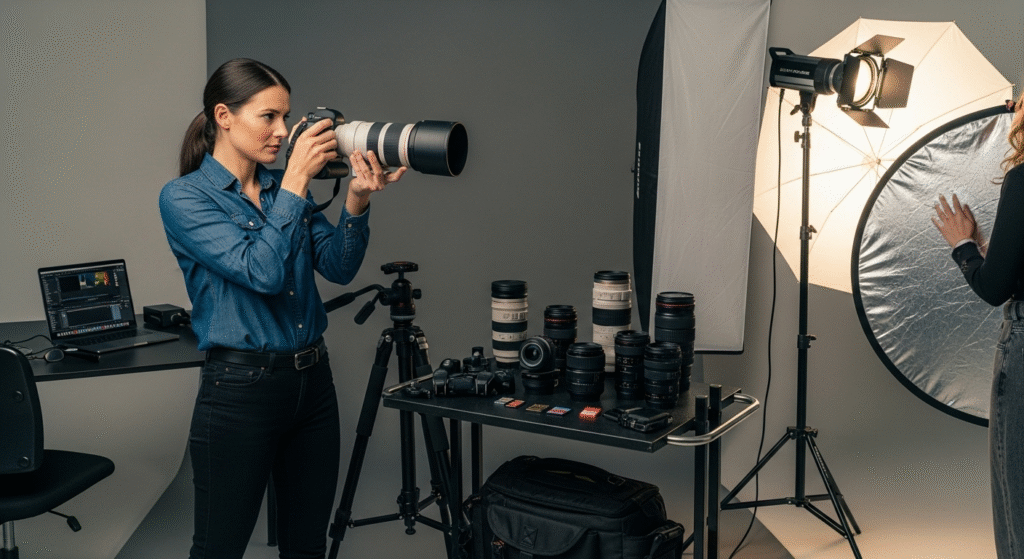
Having the right tools is the foundation of successful Real Estate Photography. A good camera, quality lenses, and a sturdy tripod can make all the difference between average photos and professional-looking results. The goal is to capture sharp, bright, and detailed images that make a property look its best. Using the right equipment ensures you can shoot in different lighting conditions and maintain high image quality for every listing.
A good camera is the heart of real estate photography. DSLR or mirrorless cameras are ideal because they offer full manual control over settings like aperture, shutter speed, and ISO. This flexibility helps you adapt to various lighting conditions inside and outside the property. Pair your camera with a wide-angle lens, which allows you to capture more of the room in one frame, making spaces look larger and more open. A lens with a focal length between 10–24mm works perfectly for most interior shots.
A tripod is another essential piece of gear. It keeps your camera steady and prevents blurry images, especially in low-light situations where slower shutter speeds are needed. Tripods also help you maintain consistent framing and composition throughout the shoot.
Lighting equipment plays an equally important role in Real Estate Photography. Even though natural light is ideal, not every home has perfect lighting. Softbox lights or portable LED panels can help brighten darker areas and balance shadows. Using diffused light creates a clean, even look that feels natural and inviting.
For beginners, there are many budget-friendly options that still produce excellent results. Entry-level cameras from Canon, Nikon, or Sony, paired with an affordable wide-angle lens and a lightweight tripod, can deliver professional-quality photos. You don’t need to start with expensive gear—what matters is learning how to use your equipment effectively.
Tip 2: Focus on Lighting
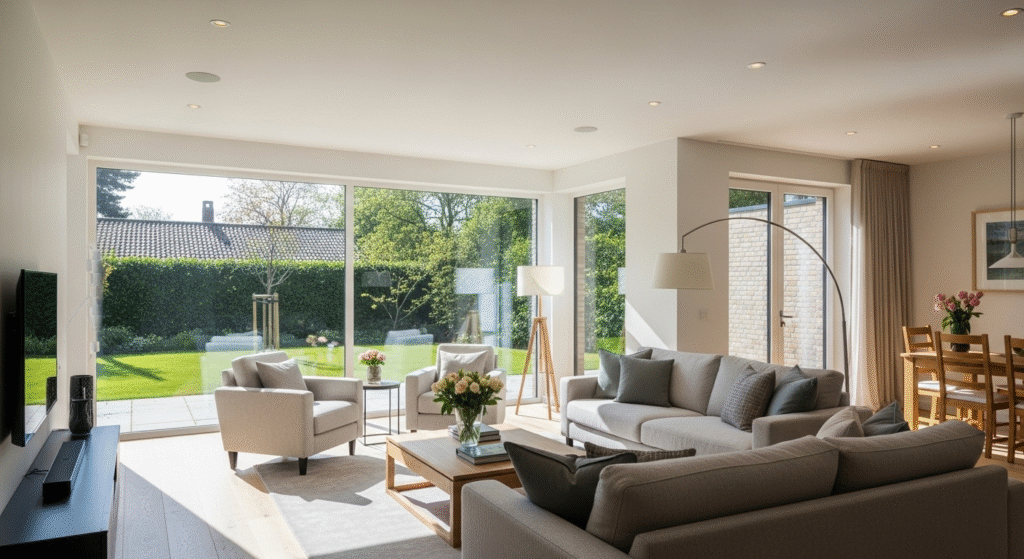
Lighting is one of the most critical aspects of Real Estate Photography. The right lighting can transform an ordinary property into something truly eye-catching. Good lighting highlights a home’s best features, creates depth, and makes every room look warm and welcoming. Understanding how to use light effectively will help you capture photos that attract buyers instantly.
The best time of day to shoot depends on the property and the type of shot. For exterior photos, early morning or late afternoon—the golden hour—provides soft, warm light that enhances textures and colors. For interiors, midday is often best because sunlight is bright enough to fill rooms naturally. Always open curtains and blinds to let in as much light as possible. Natural light creates a realistic and pleasant look in real estate photos.
However, sometimes natural light isn’t enough. That’s where artificial lighting comes in. Using softbox lights or LED panels can help fill dark corners and create balanced exposure. The goal is to make lighting appear natural, not harsh or uneven. Avoid direct flash, as it can create unwanted reflections or shadows that distract from the image.
It’s also important to avoid harsh shadows and overexposure. Check your camera’s histogram to ensure the lighting is balanced. Overexposed photos lose detail, while underexposed ones appear dull. Adjust the camera’s settings, or take multiple shots at different exposures and combine them later in editing for the best results.
To achieve bright, balanced photos that draw attention, use a technique called bracketing, taking several shots at different exposure levels. Later, you can merge them using HDR (High Dynamic Range) editing to get perfectly lit images. This is a common practice in professional Real Estate Photography.
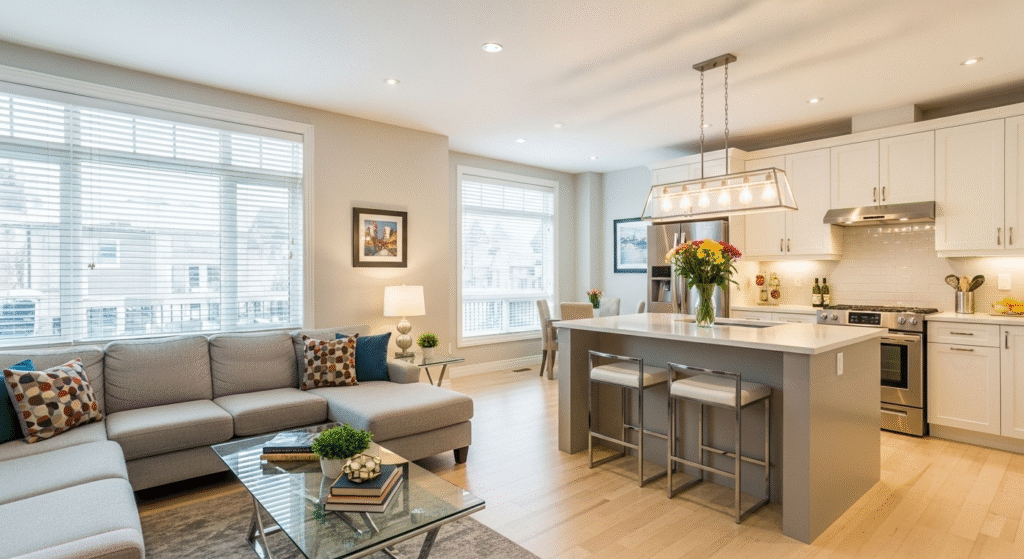
Tip 3: Stage the Property Professionally
Staging is an essential part of Real Estate Photography because presentation matters just as much as technique. A clean, well-organized, and tastefully decorated space photographs far better than a cluttered one. Staging helps potential buyers imagine themselves living in the home, which can make listings more appealing and memorable.
Start by ensuring the property is clean and clutter-free. Remove unnecessary items like personal photos, piles of mail, or kitchen appliances from countertops. Clear surfaces make spaces look larger and neater. Dust furniture, vacuum carpets, and wipe windows before the shoot. Clean spaces not only look better but also reflect positively on the homeowner and real estate agent.
Next, focus on simple staging ideas to enhance visual appeal. Add fresh flowers, a cozy throw blanket, or a bowl of fruit to bring life to the space. Make beds neatly, fluff pillows, and arrange furniture in a way that highlights the room’s layout. Symmetry and simplicity often work best in Real Estate Photography, helping the viewer focus on the space itself rather than distractions.
Even small décor changes can make a big difference in photos. For instance, replacing dark curtains with lighter ones allows more natural light in, instantly brightening the room. Adding a mirror can make a small room look larger and more open. Pay attention to details like straightening picture frames and aligning chairs evenly—it gives photos a polished, professional feel.
In today’s market, virtual staging is also gaining popularity. It allows you to digitally add furniture and décor to empty spaces using specialized software. Virtual staging can be cost-effective and gives buyers a clear idea of how a space could look furnished.
Tip 4: Master Composition and Angles
Composition and angles are what give your Real Estate Photography that professional edge. They help tell the story of the property and make photos visually engaging. Even with great lighting and equipment, poor composition can make a beautiful home look dull. Learning how to frame shots correctly and choose the best angles is essential for creating images that impress buyers.
Start with the basic rules of composition. The rule of thirds is a simple yet powerful guideline—imagine dividing your image into a grid with two horizontal and two vertical lines. Place key elements like doors, windows, or furniture along these lines to create a balanced photo. Use symmetry and leading lines to guide the viewer’s eye through the frame naturally. This makes each photo look more structured and appealing.
Finding the best angles for each room takes practice. In most cases, shooting from the corners of a room helps capture both depth and space. It allows viewers to see multiple walls and get a better sense of size and layout. Keep your camera at chest or doorknob height (about 4 to 5 feet from the ground) for interior shots to achieve a natural perspective. Avoid shooting too high or too low, as it can distort proportions.
To make small spaces look larger, use a wide-angle lens carefully. It captures more of the room without exaggerating the space unnaturally. Position yourself diagonally across the room, keeping vertical lines straight to avoid a “tilted” effect. You can also slightly open doors to give a sense of connection between rooms.
In Real Estate Photography, composition isn’t just technical; it’s creative. Framing windows to show outdoor views, centering furniture for balance, or using reflections strategically can add depth and character. Always take multiple shots from different perspectives and choose the most visually balanced ones during editing.
Tip 5: Edit Photos for a Polished Look
Editing is where good photos become great in Real Estate Photography. Even with the best equipment and lighting, post-processing adds that final professional touch that makes your images stand out. Proper editing helps correct small flaws, balance lighting, and create a consistent style across all property listings. The goal is not to change reality but to enhance what’s already there.
Start with basic editing techniques like adjusting brightness, contrast, and color correction. These small changes can make a big difference in how a property looks. Brightness adjustments can make dark rooms feel inviting, while contrast adds depth and definition. Color correction ensures that walls, floors, and décor look natural and true to life, an important detail in Real Estate Photography.
Next, use the right photo editing tools or software. Programs like Adobe Lightroom and Photoshop are favorites among professionals. Lightroom is perfect for batch editing, allowing you to adjust multiple images quickly and consistently. Photoshop works well for fine-tuning details or removing minor distractions like cords or blemishes on walls. For beginners, free tools such as Snapseed or Canva can also provide excellent results.
It’s essential to keep photos looking natural. Over-editing such as over-saturating colors or blurring backgrounds, can make images look fake and mislead potential buyers. The best Real Estate Photography looks clean, bright, and realistic, helping viewers imagine the property as it truly is.
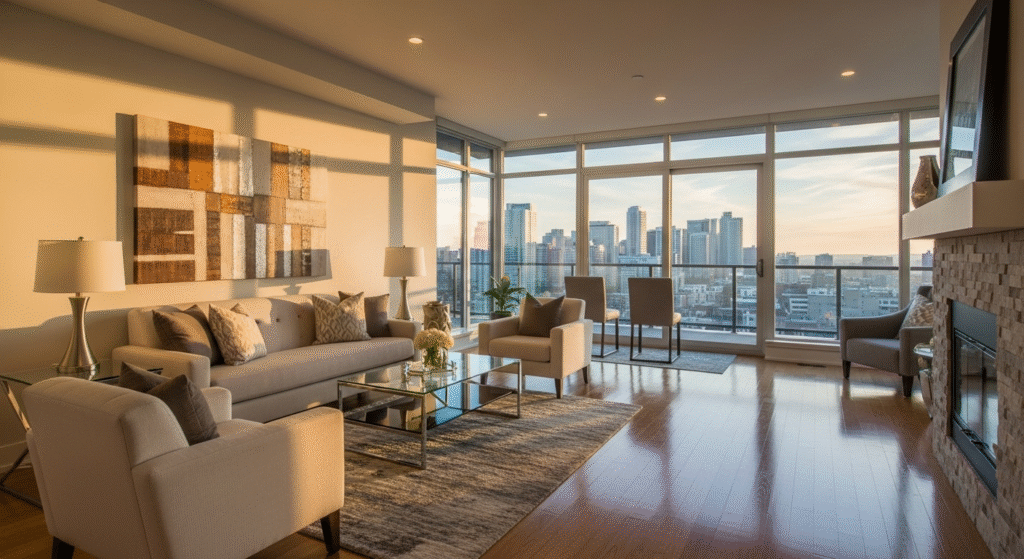
Tip 6: Highlight Key Selling Features
A big part of Real Estate Photography is knowing what makes each property special and making those features stand out. Every home has something unique—maybe it’s a spacious kitchen, a beautiful view, or a cozy backyard. Highlighting these key selling points helps potential buyers connect emotionally with the property before they even visit.
Start by identifying and showcasing the property’s best elements. Think about what adds value or charm to the home. For example, photograph modern kitchens with wide shots that capture lighting and design, or focus on large windows that show off natural light. In outdoor areas, show gardens, patios, or swimming pools in their best light. Capturing these details properly can make your Real Estate Photography more effective and memorable.
Use your photos to tell a story. A well-composed series of images can guide viewers through the property as if they’re walking inside. Begin with exterior shots, then move through living spaces, bedrooms, and outdoor areas. This flow helps buyers visualize how the space fits their lifestyle.
Creating emotional appeal is another important aspect. Warm, inviting tones make homes feel comfortable, while bright, open shots make them look spacious. Subtle touches like showing sunlight streaming through windows can create feelings of warmth and positivity. The most successful Real Estate Photography connects viewers emotionally and inspires them to imagine living there.
Conclusion
Real Estate Photography is a powerful tool for making property listings stand out in a competitive market. By using the right equipment, mastering lighting, staging effectively, and editing carefully, you can create images that truly capture a home’s beauty and value. Highlighting key selling features helps potential buyers connect emotionally and imagine themselves in the space. Great photos don’t just show a property, they tell its story. With these simple yet effective tips, your Real Estate Photography can attract more attention, build trust, and help sell properties faster and with greater success.
FAQs
Why is Real Estate Photography important for property listings?
Real Estate Photography is important because high-quality photos create a strong first impression. Most buyers search online, so clear and attractive images help listings stand out. Good photos show space, lighting, and design accurately, making a property more appealing. Professional-looking images also build trust with buyers and can lead to faster sales. In short, great Real Estate Photography helps turn online views into real visits and serious offers.
Can I do Real Estate Photography with my smartphone?
Yes, you can start Real Estate Photography with a smartphone if it has a good camera. Many modern phones can capture high-quality images when used correctly. Use natural light, keep the camera steady, and shoot from the corners of rooms to show space. While a professional camera gives more control and sharper results, beginners can still create impressive property photos with practice and basic editing on their smartphones.
How can I make small rooms look bigger in Real Estate Photography?
To make small rooms appear larger in Real Estate Photography, use a wide-angle lens and shoot from the corners of the room. Keep the space clutter-free and use light-colored décor to brighten the area. Good lighting also helps natural light makes rooms look more open. Avoid tight framing and low angles. These simple tricks help showcase the true potential of smaller spaces in your Real Estate Photography projects.
Do I need professional editing software for Real Estate Photography?
Professional editing software can improve your Real Estate Photography, but it’s not always required. Tools like Adobe Lightroom and Photoshop offer great control over brightness, color, and contrast, making photos look polished. However, free apps like Snapseed or Canva also work well for basic editing. What matters most is keeping photos natural and consistent. Editing helps correct small flaws and gives your Real Estate Photography a clean, professional finish.
How can Real Estate Photography increase property sales?
High-quality Real Estate Photography attracts more potential buyers by making listings look professional and inviting. Well-lit, detailed photos help highlight a property’s best features and create emotional appeal. When buyers can clearly see a home’s beauty online, they’re more likely to schedule a visit. Consistent, professional images also build trust in the seller or agent. Simply put, great Real Estate Photography helps properties sell faster and often at better prices.